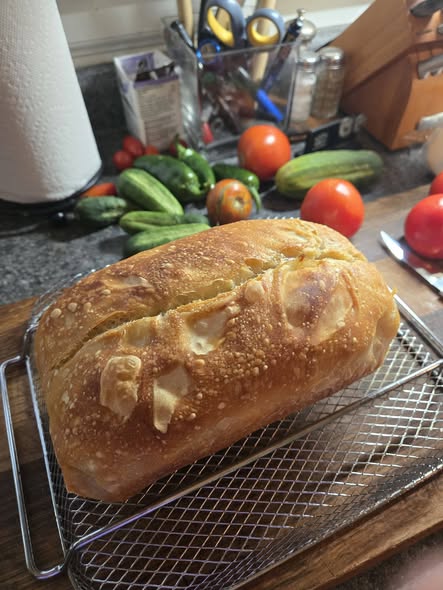
🍞✨ Classic Homemade Sourdough Bread — Crispy Crust, Chewy Center and Beautiful Artisan Flavor!
There is something incredibly satisfying about baking your own Sourdough Bread from scratch.
This classic loaf develops a deeply golden, crackly crust with a soft, chewy interior and that signature lightly tangy sourdough flavor.
Unlike quick yeast breads, sourdough relies on a naturally active starter and a slow fermentation process. The extra time rewards you with wonderful flavor, beautiful air pockets, and an artisan-style loaf right from your own kitchen.
Perfect for toast, sandwiches, soup, grilled cheese, avocado toast, or simply warm slices spread with butter.
⏱️ Hands-On Prep Time: About 30 minutes
⏳ Fermentation & Proofing: 12–18 hours
🔥 Bake Time: 40–50 minutes
🍞 Yield: 1 large loaf
Ingredients
- ½ cup active sourdough starter, about 100 grams
- 1⅓ cups lukewarm water, about 325 grams
- 4 cups bread flour, about 500 grams
- 2 teaspoons fine sea salt, about 10 grams
- Rice flour or all-purpose flour, for dusting
Before You Begin
Your sourdough starter should be active and bubbly.
For the best results, feed the starter several hours before mixing the dough.
A ready starter should:
- Look bubbly
- Have increased noticeably in volume
- Smell pleasantly tangy
- Look airy rather than flat and watery
Instructions
1. Mix the Starter and Water
Add the active sourdough starter and lukewarm water to a large bowl.
Stir until the starter is mostly dissolved.
2. Add the Flour
Add the bread flour.
Mix with your hand, wooden spoon, or dough whisk until no large patches of dry flour remain.
The dough will look shaggy and sticky.
Cover and let it rest for 30 minutes.
3. Add the Salt
Sprinkle the salt evenly over the dough.
Use damp hands to squeeze and fold the salt into the dough until evenly incorporated.
4. Begin Bulk Fermentation
Cover the bowl.
Let the dough ferment at room temperature.
During the first 2 hours, perform several sets of stretch-and-folds.
5. Stretch and Fold
With damp hands, grab one side of the dough.
Stretch it upward gently and fold it over the center.
Rotate the bowl and repeat on all four sides.
Perform approximately 4 sets, spaced about 30 minutes apart.
The dough should gradually become smoother and stronger.
6. Continue Fermenting
After the final fold, leave the dough covered until it becomes noticeably puffier and increases in volume.
Depending on room temperature and starter strength, this may take 4–7 hours total.
Do not wait only for a timer.
Look for dough that:
- Has risen noticeably
- Looks smoother
- Has bubbles around the sides
- Jiggles slightly when the bowl moves
7. Pre-Shape
Lightly flour a work surface.
Turn the dough out gently.
Shape it into a loose round without pressing out all the air.
Let it rest uncovered for approximately 20 minutes.
8. Final Shape
Shape the dough into a tight round or oval.
Try to create surface tension without tearing the dough.
9. Prepare the Proofing Basket
Dust a banneton or clean towel-lined bowl generously with rice flour.
Place the shaped dough seam-side up inside.
Cover.
10. Cold Proof Overnight
Refrigerate for approximately 8–14 hours.
Cold fermentation deepens the flavor and makes the dough easier to score.
11. Preheat the Oven
Place a Dutch oven with its lid inside the oven.
Preheat to 475°F for approximately 45 minutes.
12. Score the Dough
Turn the chilled dough onto parchment paper.
Dust lightly with flour if desired.
Use a sharp bread lame or razor blade to make one confident slash approximately ½ inch deep.
13. Bake Covered
Carefully transfer the dough into the hot Dutch oven.
Cover with the lid.
Bake at 450°F for approximately 20 minutes.
14. Bake Uncovered
Remove the lid.
Continue baking for approximately 20–25 minutes, or until the crust is deeply golden brown.
For an extra-dark artisan crust, bake a few minutes longer.
15. Cool Completely
Transfer the loaf to a wire rack.
Allow it to cool for at least 1–2 hours before slicing.
Cutting too early can make the interior gummy because the crumb is still setting.
Tips for Better Sourdough
✅ Use an active starter.
✅ Measure ingredients by weight when possible.
✅ Do not rush fermentation.
✅ Use wet hands rather than excessive flour when handling sticky dough.
✅ Cold-proof overnight for better flavor.
✅ Preheat the Dutch oven thoroughly.
✅ Let the loaf cool before slicing.
Why Is My Sourdough Dense?
Possible causes include:
- Weak starter
- Under-fermentation
- Dough was too cold
- Too much flour
- Dough was aggressively degassed
- Proofing time was too short
Why Did My Loaf Spread Flat?
Possible reasons include:
- Over-fermentation
- Weak gluten development
- Too much hydration
- Loose shaping
- Dough became too warm
Why Is My Sourdough Gummy?
The bread may have:
- Been underbaked
- Been sliced while hot
- Fermented incorrectly
- Contained too much water for the flour used
Allow it to cool completely before cutting.
Easy Add-Ins
Once you master the basic loaf, try:
Garlic Herb
Add roasted garlic, rosemary, and thyme.
Cheddar Jalapeño
Fold in shredded cheddar and diced jalapeños.
Olive Sourdough
Add chopped, well-drained olives.
Cinnamon Raisin
Add raisins and cinnamon for a breakfast-style loaf.
Storage
Store sourdough cut-side down on a cutting board for the first day.
For longer storage, place it in a bread bag or wrap loosely.
Avoid refrigerating unless necessary because refrigeration can make bread stale faster.
Freezing
Slice the cooled loaf.
Freeze individual slices in a freezer-safe bag for up to 3 months.
Toast directly from frozen.
📌 Save this recipe for your next sourdough baking day!
👇 Would you make yours classic, garlic-herb, cheddar-jalapeño, or cinnamon-raisin?
#SourdoughBread #HomemadeSourdough #BreadBaking #ArtisanBread #SourdoughStarter #HomemadeBread #BreadFromScratch #BakingAtHome #SourdoughRecipe #RecipeOfTheDay